Managing Sessions Assigned to Mentors
Session managers can carry out the following activities:
- After publishing sessions, you can view their details such as the session's schedule, the number of enrollments, and the type of session.
- Track the session's progress using the following session statuses:
- Upcoming: The mentor is yet to host the session.
- Live: The mentor has started the session.
- Completed: The mentor completed the session.
- Update the session information.
- Delete the session.
Viewing the List of Published Sessions
After publishing sessions, the list of sessions appear on the Session list section.
To view the Session list section, do as follows:
Do one of the following actions:
- On desktop: Select Workspace from the left panel.
- On mobile: Tap the
 icon and select Workspace.
Click Manage sessions.
Go to the Create sessions tab. The Session list section appears.
tipClick the Download link to download the session list as a CSV file.

To find a session from the Session list section, use the following methods:
Change the number of sessions listed on the page using the Items per page dropdown.
View the sessions on different pages by clicking the Next or Previous buttons.
Enter the session title or the mentor's name in the Search box and press Enter.
Filter the list using the following methods:
Click on Filters.
Select one or more filter checkboxes and click Apply.
tipTo clear filters, do one of the following actions:
- Clear the specific filter checkbox.
- Click Clear all to clear all the applied filters.
Tracking the Number of Enrollments
You can view the number of mentees who have enrolled or those who were invited to the session.
On the Session list section, do any one of the following actions:
View the Mentee count value.
Click
 and view the Mentee count value on the Session Details page.
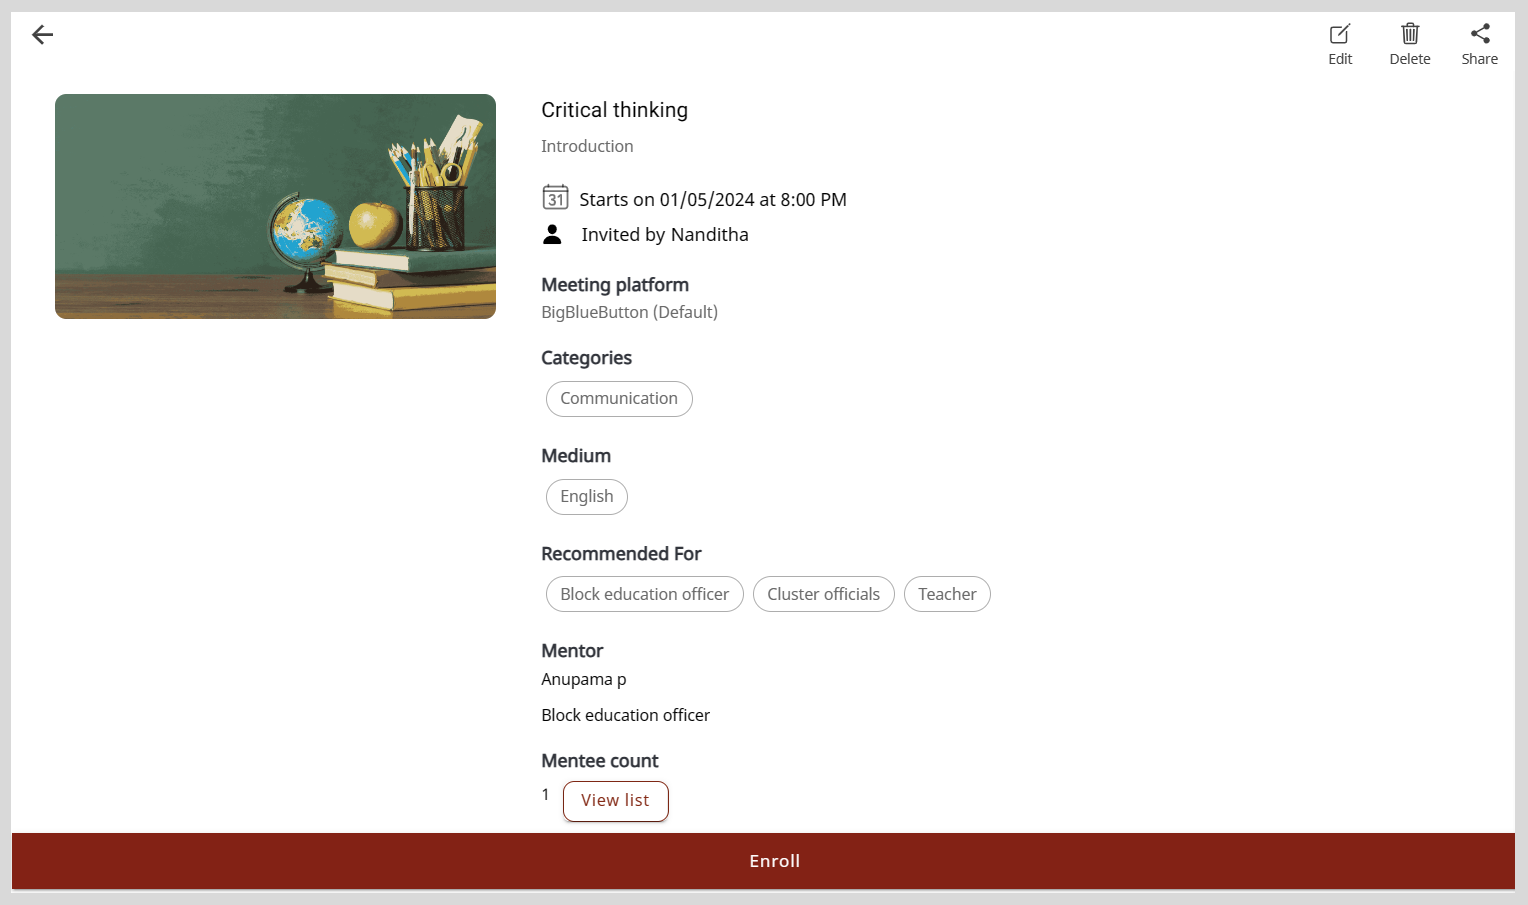
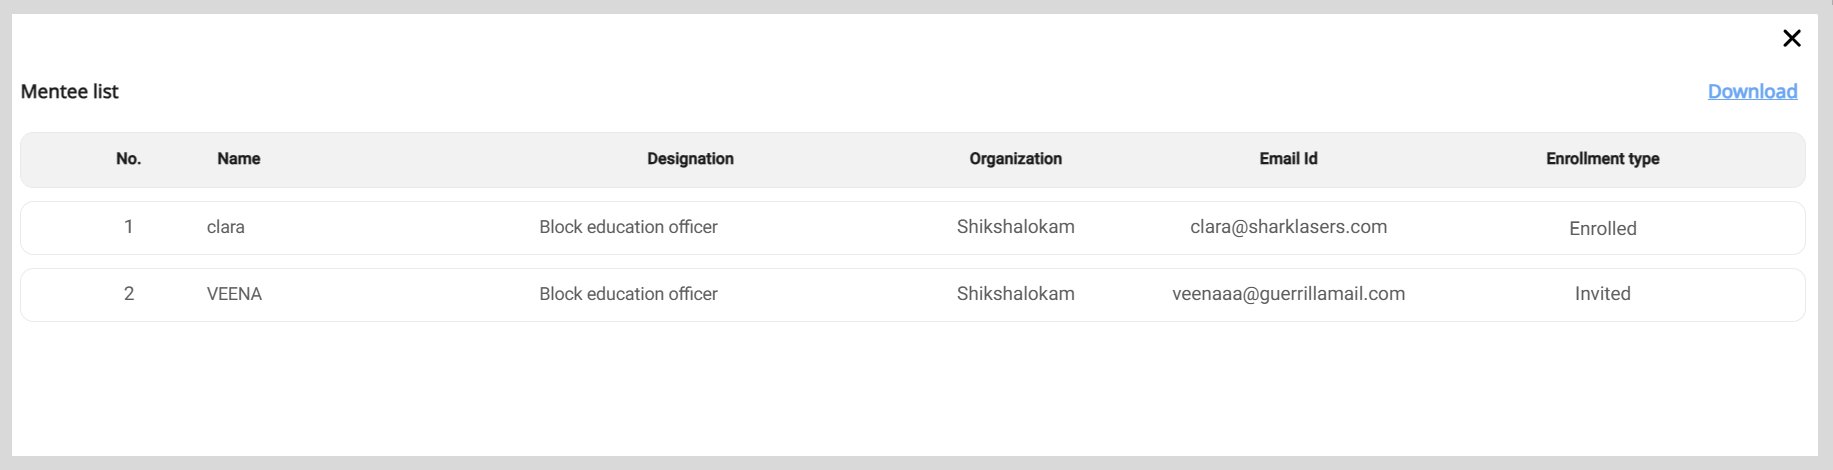
Viewing the List of Mentees
On the Mentee list window, you can do the following actions:
- View mentees' details.
- Check whether the mentees have enrolled for the session or have been invited to the session.
To view the list of mentees, do any one of the following actions:
On the Session list section, find a session and click the Mentee count value. The Mentee list window appears.
tipClick the Download link to download the mentee list as a CSV file.
Do the following actions:
On the Session list section, find a session and click
. The Session Details page appears.Click View list. The Mentee list window appears.
tipClick the Download link to download the mentee list as a CSV file.
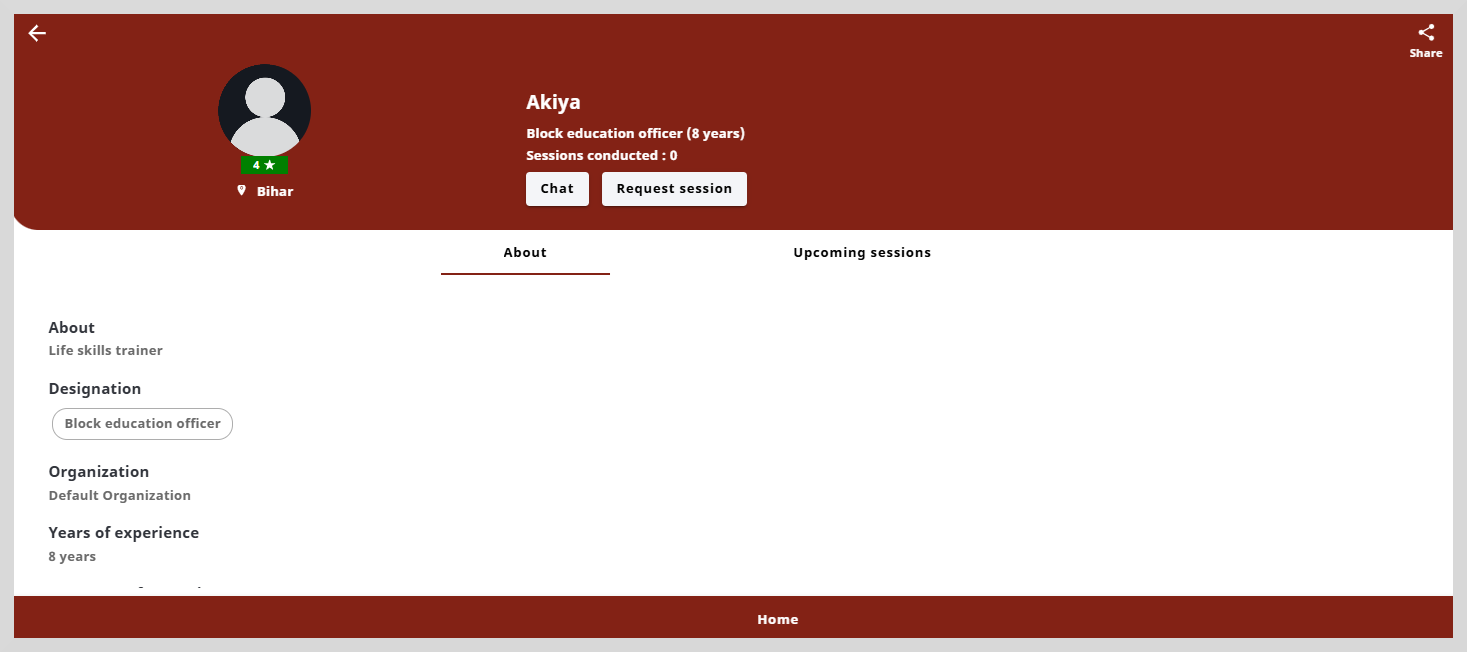
Viewing the Mentor Profile page
On the Mentor Profile page, you can view a mentor's details such as the number of sessions hosted and the rating received for sessions.
To view the Mentor Profile page, click the mentor's name on the Session list section.
Updating Session Details
You can edit sessions using any one of the following methods:
- Using the Session List section
- Using Bulk Upload
Using the Session List Section
To view the Edit session details page, do one of the following actions:
On the Session list section, click
 .
.Do the following actions:
On the Session list section, click
. The Session Details page appears.Click Edit.
Updating the Session Information
You can edit the session details only until the mentor starts the session.
To edit the session information, do as follows:
On the Edit session details page, go to the Edit session tab.
Make the necessary changes to:
The session information.
The list of mentees who were invited to the session. To update the list, do any one of the following actions:
- To invite new mentees, click + Add New Mentee and add mentees from the list.
- To remove mentees from the list, click the mentee's name and click Remove on the Mentee list window.
The session image. To update the session image click Add image and do one of the following actions:
To take a picture, select Take Photo.
To upload an image, select Choose from library.
To remove the existing image, select Remove current photo.
tipSelect an image that is relevant to the session topic.
Click Save. The session details are updated.
Updating the Meeting Information
You can edit the meeting information even after the mentor has started the session.
To edit the meeting information, do as follows:
On the Edit Session Details page, go to the Meeting link tab and make the necessary changes.
Click Submit. The meeting information is updated.
Using Bulk Upload
To update multiple sessions, you can upload a CSV file containing the list of updates in the session or meeting information to the application.
To edit sessions using bulk upload, do as follows:
Do one of the following actions:
- On desktop: Select Workspace from the left panel.
- On mobile: Tap the icon and select Workspace.
Click Manage sessions.
Go to the Bulk upload tab.
Click Download sample CSV to download the sample CSV file. The downloaded sample file contains sample information that you must clear before adding the session details.
Enter the details of only those sessions that need to be updated.
tipIf you had created sessions using bulk upload, open the respective CSV file.
To update the details, do as follows:
Enter Edit in the Action column.
Enter the session ID in the ID column.
tipYou can find the session ID in the session list section or in the CSV file that you have received after uploading a list of sessions to the application.
Make the necessary changes as per the following table:
Details Actions Title You must enter the topic for the session. Description You must provide further details on the session. Type You must specify the type of session as Private or Public.
noteYou cannot change the session type after publishing the session.Mentor You must enter the email ID of the mentor to whom you want to assign the session.
noteAfter publishing the session, you cannot assign the session to a different mentor.Mentees To invite mentees to a session, enter the email IDs of one or more mentees.
tip- It is optional to invite mentees to a Public session.
- After a session is published, you can update the list of invited mentees by adding or removing mentees.
- To facilitate one-on-one mentoring, you can set up Private sessions consisting of an invited mentee.
noteThe number of invited mentees should be within the session enrollment limit.
Date You must enter the scheduled date in DD-MM-YYYY format. Time Zone You must specify the time zone as IST or UTC.
noteOn the application, the time displayed is IST.Time As per the specified time zone, you must enter the scheduled start time using a 24-hour clock format. For example, to schedule a session at 5 pm, specify the time as 17:00 Hrs.
noteWhile scheduling a session, ensure that the mentor does not have another session scheduled during the same time.
You cannot assign back-to-back sessions to a mentor. For example, if a mentor is assigned a session from 3pm to 4pm, you cannot assign another session at 4pm.
Duration You must enter the duration of the session in minutes.
note- Enter only numerical values. For example: 60.
- The session duration should be at least 30 minutes.
Recommended For You must specify one or more target mentees for the session. For example: Teachers, Block education officer Categories You must specify one or more categories to which the session topic belongs. For example, if the session topic is Communication Skills Training, the categories can be Communication, Life skills. Medium You must enter the language using which information is communicated during the session. Meeting Platform Specify the meeting platform. The supported meeting platforms are as follows:
- BigBlueButton
- Google Meet
- Zoom
noteIf you have not specified a meeting platform, BigBlueButton is set as the default platform.Meeting Link For meeting platforms other than BigBlueButton, copy and paste the meeting link. Meeting Passcode If the meeting platform is Zoom, copy and paste the meeting passcode.
On the Bulk upload tab, click Upload CSV and select the CSV file containing the edited session details. The session details are updated.
noteAfter updating sessions, you will receive a CSV file in your email that displays details such as:
- ID
- Session status (Valid or Invalid)
- Status message
If the details entered in the uploaded CSV need corrections, the session status would be invalid and the session is not updated. In such cases, refer to the status message and upload the respective file with the updated details.
To make the necessary updates, see the Troubleshooting Invalid Messages section.
Deleting Sessions
You can delete sessions using any one of the following methods:
- Using the Session List section
- Using Bulk Upload
You can delete the session only until the mentor starts the session.
Using the Session List Section
To delete the session, do one of the following actions:
On the Session List section, click
 .
.Do the following actions:
On the Session List section, click
. The Session Details page appears.Click Delete.
Click Yes delete on the confirmation dialog. The session is cancelled and is removed from the Session list section.
Using Bulk Upload
To delete multiple sessions, you can upload a CSV file containing the list of sessions to be deleted to the application.
Do one of the following actions:
On desktop: Select Workspace from the left panel.
On mobile: Tap the
icon and select Workspace.
Go to the Bulk upload tab.
Click Download sample CSV to download the sample CSV file. The downloaded sample file contains information that you must clear before adding the session details.
tipIf you had created sessions using bulk upload, open the respective CSV file.
Do as follows:
Enter Delete in the Action column.
In the ID column, enter the session IDs of the session that you want to delete.
tipYou can find the session ID in the session list section or in the CSV file that you have received after uploading a list of sessions to the application.
noteThe file must include only those sessions that should be deleted from the application.
On the Bulk upload tab, click Upload CSV and select the CSV file containing the list of sessions to be deleted. The session is removed from Session list section.
noteAfter deleting sessions, you will receive a CSV file in your email that displays details such as:
- ID
- Session status (Valid or Invalid)
- Status message
If the details entered in the uploaded CSV are incorrect, the session status would be invalid and the session will not be deleted. In such cases, refer to the status message and upload the respective file with the correct details
To make the necessary updates, see the Troubleshooting Invalid Messages section.